
Learn step-by-step how to make this Vegan Whole Grain Spelt Sandwich bread. It is just 5 ingredients, oil-free, healthy and so fresh and delicious!

VEGAN WHOLE GRAIN SPELT SANDWICH BREAD
Bread, bread, bread! Sandwich bread, hamburger buns, etc. That has been what you guys have been emailing me about for months. A lot of you just wanted a healthy vegan bread, a few of you wanted a gluten-free bread, but all of you wanted oil-free. Well, today is the day folks. I’m sharing the easiest recipe ever to make some amazing Vegan Whole Grain Spelt Sandwich Bread.
Now, this is not gluten-free, it is whole grain. 95% of what I post on this blog is gluten-free, however, as I mentioned in these Fluffy Spelt Bluberry Pancakes post, I really love to use spelt. I love the earthy flavor of it and it’s soft texture.

This homemade spelt sandwich bread has a wonderful crusty exterior and a soft, chewy center…just as a sandwich bread should be. Perfect for sandwiches or my favorite, toast! I love bread that is toasted the most, always have. It is so good with some almond butter, or hummus, or even some melted coconut butter. My favorite though is always avocado toast. YUM.
I’ve tried a billion breads out there from the stores. Some are good, most aren’t that great. A lot of them have so many nasty preservatives, chemicals and dough conditioners to keep them soft. So, while homemade bread goes stale quicker, at least you get that fresh homemade taste and can actually feel good about eating homemade bread. I have made many loaves to stock up and now keep a lot of them in my freezer (pre-sliced) so they last longer. I just grab a piece and toast them up when I want a snack. SO GOOD.

I mean, come on, look at that perfect texture. And can you believe that this vegan spelt bread is only 5 ingredients (+ salt & water). How freaking simple is that??
Since spelt can taste rather earthy or even slightly bitter, it is necessary to use a good touch of maple syrup here, more than you would for regular white flour.

The smell of homemade bread is just so amazing and addicting. I remember my Mom making it a lot when I was in high school, but she used a bread machine that my Dad had bought her. The taste was delicious and so fresh. I love to knead the dough though…I love every part of baking, every step….well, except for cleaning up all the dang dishes.
MAKING HOMEMADE BREAD IS EASIER THAN YOU THINK
Making this vegan whole grain spelt sandwich bread is much easier than it looks. I understand how bread making can intimidate people. This step-by-step tutorial will make it easy for you. You literally dump everything into a bowl, give it a good stir and knead for a few minutes and then let it rise. Then you just form it into a loaf shape and let it rise one more time and then bake. Super easy. Most of it is not hands-on time, so it’s very easy. The key is following the directions.
Every flour performs differently, and this recipe I wrote based on the nature of spelt flour alone. Spelt doesn’t perform the same way as wheat or all-purpose flour, so you can’t just sub and expect the same results. There is less gluten in spelt, so it is more tender and requires less kneading, yet enough to make it elastic. It also holds a bit more moisture. While it took me a few tries to get it right, I was determined to use spelt and not any other flour.

Can we all just get a load of that glorious rise on that bread?? After my first couple of trials failed, I was dancing around the kitchen with joy with how this one turned out. This loaf surprisingly only took me 3 trials to nail the final perfect loaf. 3rd time was in fact, a charm. I have never made a loaf before with spelt, only regular all-purpose flour, so it was a bit more challenging.
I learned really quickly what errors I made. My first loaf I simply added too much water, so the dough rose so high (because of so much moisture) because the yeast reacts off of the moisture and it basically exploded and deflated in my oven, lol. This is what can happen if you have too much water or let it rise too much…deflated city…

Not very pretty, huh? It was still edible though. Wasn’t a waste. I just toasted it up and voila. I ultimately found success though with the perfect loaf, as you can see.
HOW TO MAKE HOMEMADE VEGAN SPELT SANDWICH BREAD
So, to make things as simple for you as possible, I’m including pics as well for the steps. This helped many of you successfully make my Apple Hand Pies, so I figured this was important for the bread. These are just brief pics and details, see the FULL directions below on the print-out and follow them.

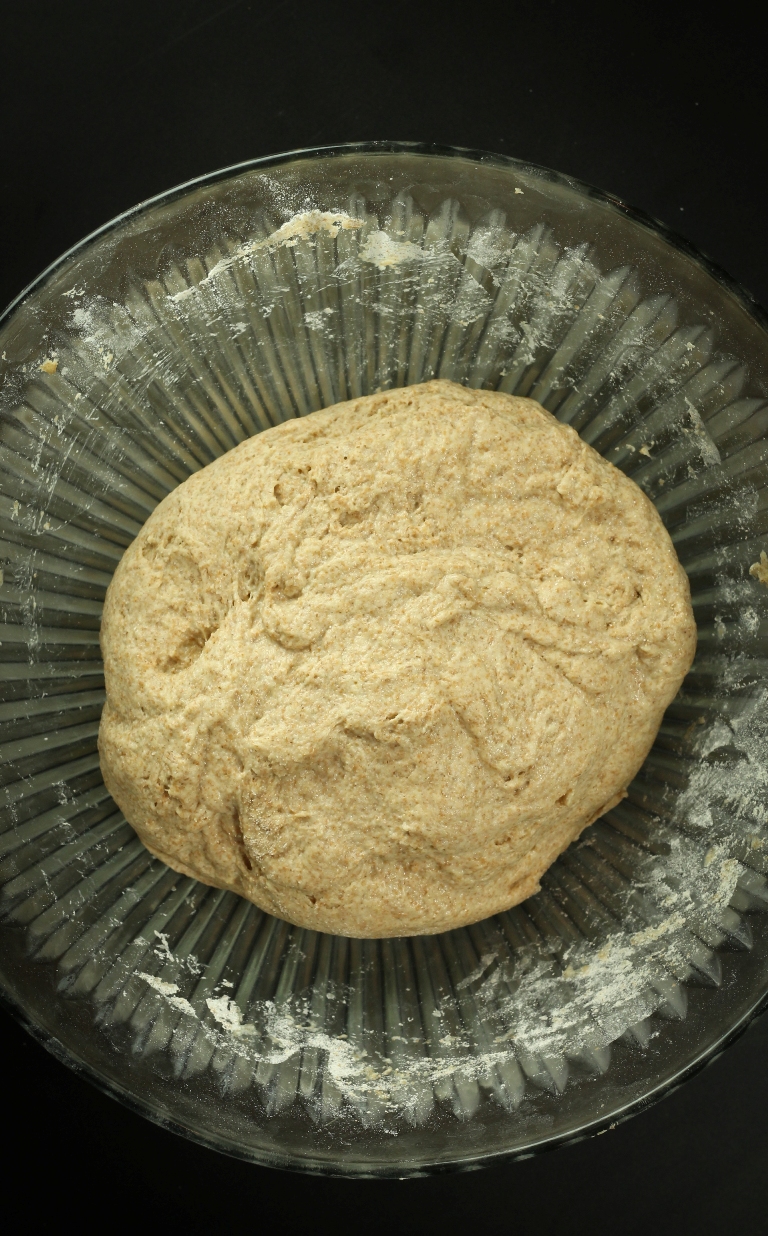
Add all of your ingredients to a bowl (see full directions in print-out below). Stir and press the dough using the spatula until all the flour is mixed in, a couple of minutes. It will look really chunky like this as first. Once, all the flour is mixed in, knead a bit inside the bowl with your hands. If it it too sticky to handle, sprinkle another tablespoon of flour or so on the top and flip the dough over and knead a bit more with the spatula, pressing and gathering over several times. Only add as little as needed, as you don’t want to dry out the dough and end up with dry bread.
If for some reason after continually mixing it seems too dry and is not becoming cohesive, add just a tiny bit of water, starting with a teaspoon just so it comes together. You don’t want it too dry to where it’s not holding together.
Form a ball, using the spatula if necessary to help. It should be elastic and a bit stretchy after 5 minutes and slightly sticky. Test it by pressing down with your spatula/spoon and dragging the dough a bit…you should see it stretch and slowly return back to it’s position. Then it’s done.
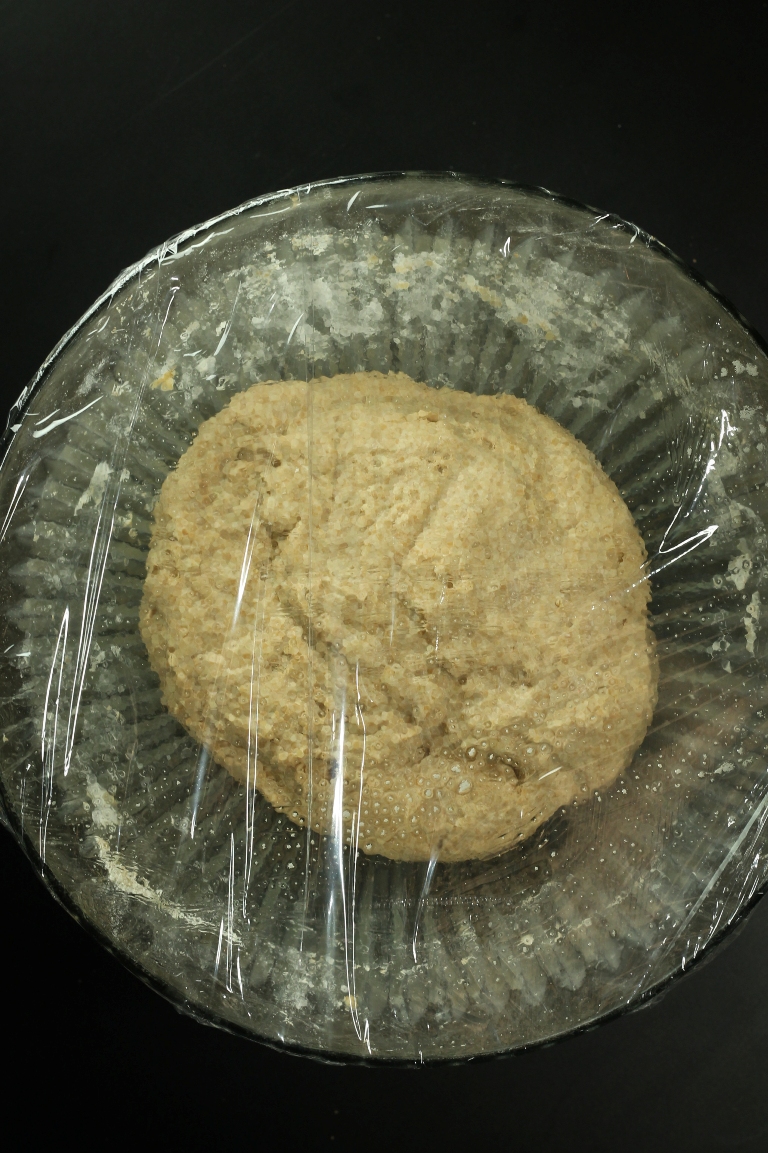
Spray a large piece of plastic wrap with nonstick spray (to prevent the dough sticking as it rises to the wrap) and place the sprayed side down over the bowl. Secure it tightly. Use 2 pieces if necessary. This is important to retain moisture, otherwise your dough will get dry and affect the rise.
LET THE DOUGH RISE
Let the dough rise in a warm (non-drafty) place until it has basically doubled, 45 mins to an hour. I highly recommend the oven with just the light turned on. It gives the most consistent results. Mine took exactly 1 hour. But yours may be faster or longer, watch it, don’t just rely on a timer.

Look at the difference!
GENTLY KNEAD THE DOUGH
Sprinkle a small bit of flour onto a clean work surface large enough for the dough (I used my granite countertops). Before you scrape the dough out, punch the dough all over to let the gas escape, this is important, otherwise your bread can deflate in the oven. If it is still a bit sticky, just use your silicone spatula to punch it a bit. Scrape your dough out of the bowl and plop it onto the floured work surface. It will be slightly sticking to the bowl (this is normal) so I found that using that silicone spatula, it was very easy to scrape out.
Knead and turn it over just a few times, it doesn’t really much more kneading at this point, as you don’t want to over knead spelt. Add a tiny bit of flour if needed to the top to get it going. The dough should be very easy to handle at this stage (and not sticky like when you first mixed it).

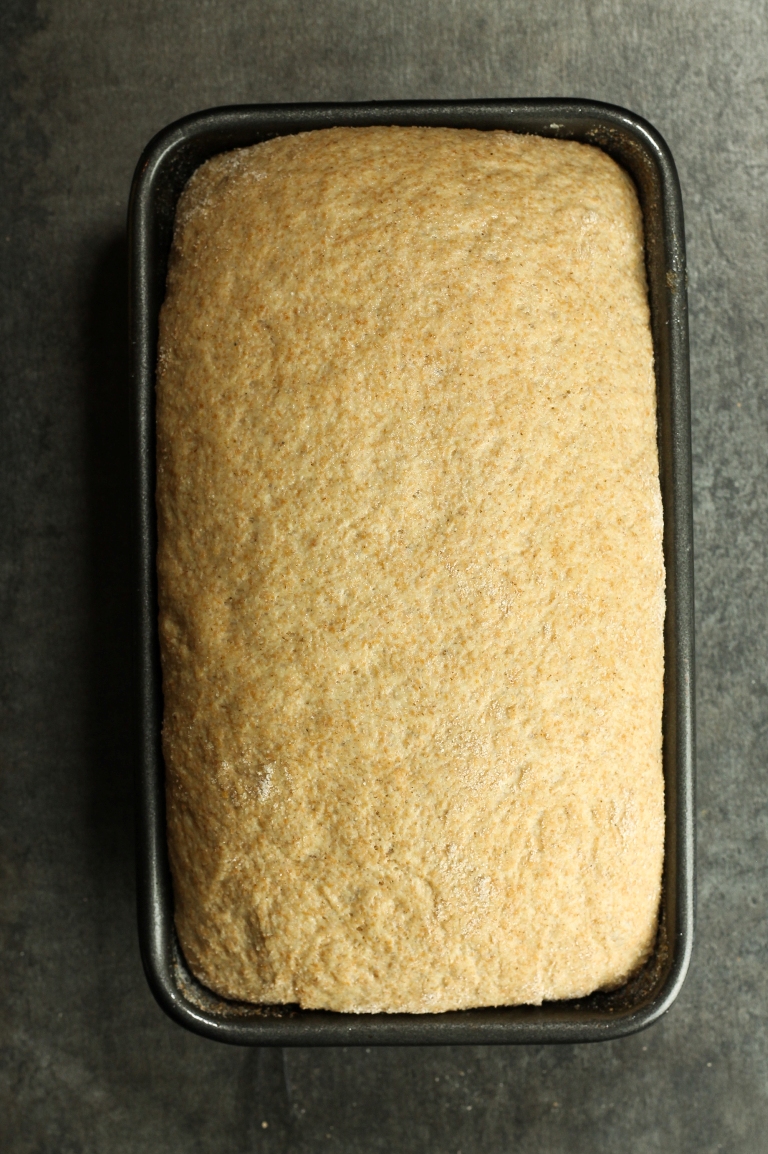
Form a loaf shape. Tuck in and fold over the sides and flip it over, seam side down into the greased loaf pan.

It’s ready for the 2nd rise. See how it’s holding it’s curved edges and shape? And the messy seams are underneath, so your top will be beautiful.
Once again, place a sprayed side down large piece of plastic wrap over the pan and secure it. It should be secure, but not so tight that it messes with your rise once the dough touches the plastic, because it will touch it! Set back in the oven with the light on to rise again to about 1 1/2 inches above the pan, from the center peak. This will take anywhere from 30 minutes to an hour or so. Mine took around 45 minutes. Again, keep checking and don’t forget. As soon as it is about 1 1/2 inches, remove from the oven and preheat it to 375 degrees. Peel the plastic off carefully, being gentle as to not mess with the rise.
IT RISES BEAUTIFULLY
Look at that beautiful rise! One thing that to learn about bread baking, that is crucial, is the rising part. Simply setting a timer and returning when that timer is not always going to work. Every environment is different…some are warmer and more moist than others, which will cause your dough to rise much faster from the yeast working.
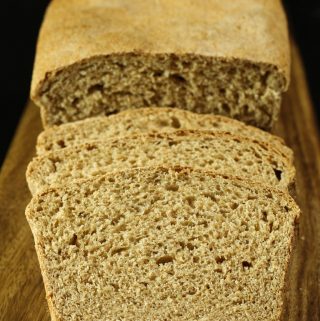
Bake your bread for 25-30 minutes, until it’s golden brown on the top and it sounds hollow when you thump the top of it. I removed mine at 28 minutes. If you are unsure of what hollow sounds like, you will know once you thump it…it straight up sounds hollow. If you are too paranoid about this, get an instant read thermometer for more accuracy. Let cool completely and admire your beautiful loaf.

Follow the thorough print-out directions below! Enjoy your yummy bread on the most amazing avocado toast ever…soo much better than storebought!

Whew, it is so much work doing these tutorials…but I do it to help you out as much as I can. I know photos can be very helpful, especially with bread. So, as always, let me know your feedback below! I hope you have success the first time making this Vegan Whole Grain Spelt Sandwich Bread. It takes a little practice sometimes to get the bread-making and kneading down, but this is one of the easiest bread recipes out there because there is such little kneading time. Leave me feedback below after you make it!
Other than the waiting for rise times, this bread is SO easy to make. Don’t let the long directions fool you, this is an incredibly easy and very minimal hands-on work…I’m just being very detailed, as always, to ensure and help you out, especially if you are new to bread-making!
Vegan Whole Grain Sandwich Bread
Ingredients
- 3 1/2 cups 480 g + more for dusting whole grain spelt flour, do not use sprouted, I used Arrowhead Mills (highly suggest a scale for best results!)
- 1 1/2 teaspoons 5 g instant rapid rise yeast (I used Fleischmann's)
- 1 1/2 teaspoons fine sea salt
- 1 1/2 tablespoons 27 g fresh squeezed orange juice (or apple juice, don't recommend lemon)
- 1 cup 250 ml warm filtered water or sub half with plant milk for a richer flavor (microwaved for 30 secs was perfect for me, you don't want hot water!)
- 3 tablespoons pure maple syrup
- 2 tablespoons 44 g unsweetened applesauce
- Note: Keep in mind this is 100% whole grain flour it does not have the same taste as white bread, it is much more earthy, which I love, but if you've never tried spelt, keep that in mind. Bread making can go great or it can go horribly. Trust me, I've been on both sides. Every single flour performs differently, and spelt performs differently than wheat flour. I have written this recipe based on spelt flour only, therefore I cannot vouch for any results if you change the recipe, I wouldn't recommend it. Stick to the recipe for best results and no, subbing for gluten-free flours will not work in this recipe.
Instructions
- For bread success, use a scale! Read through my post and follow the pics for reference and follow these directions. It's SO EASY, but I've written very detailed instructions to help you. You'll need a 9x5 metal loaf pan for this. Other materials bake up differently, so use metal, the loaf will bake up the best that way.
- Get a very large bowl with tall sides to allow for rising. Add your spelt flour, instant yeast, salt and give it a good whisk to ensure it's evenly mixed.
- Add your juice (1 1/2 tbsp) and water (1 cup) to a glass and warm up for 30 seconds in the microwave. Stick your finger in it, it should feel warm, but not so hot that you can't keep your finger in there. Too hot of water will kill the yeast. Add the syrup and applesauce to the water and stir.
- Pour over the flour slowly as you are stirring the dough. Use a sturdy rubber or silicone spatula/spoon, as this will help it not stick to the utensil. Stir and press the dough using the spatula until all the flour has is mixed in, a couple of minutes. Knead a bit inside the bowl with your hands. If it it too sticky to handle, sprinkle another tablespoon of flour or so and flip the dough over and knead a bit more, using the spatula/spoon to assist. Add only a tiny bit as needed for it to come together, too much flour and you'll end up with dry bread. If for some reason after continually mixing it seems too dry and is not becoming cohesive, add just a tiny bit of water, starting with a teaspoon just so it comes together. Do this for about 5 minutes, no more. It should become elastic/stretchy and slightly sticky. Test it by pressing down and dragging the spatula/spoon. If it stretches and then gently falls back into position, stretchy like a rubber band, stop. Don't over-knead spelt or it'll make tough bread.
- Spray a large piece of plastic wrap with nonstick spray (to prevent the dough sticking as it rises to the wrap) and place the sprayed side down over the bowl. Secure it well. Use 2 pieces if necessary. Let the dough rise in a warm (non-drafty) place until it has basically doubled (see pics), 45 mins to an hour. I highly recommend the oven with just the light turned on. It has consistently given me accurate results. Mine took a full hour, but use your eyes as well, not just a timer. It should be risen and puffed up. Yours may even take a little longer, just roughly it should be about twice the size. But don't forget about it, as over-rising can cause a deflated loaf!
- Sprinkle a small bit of flour onto a clean work surface large enough for the dough (I used my granite countertops). Before you scrape the dough out, punch the dough all over to let the gas escape, this is important, otherwise your bread can deflate in the oven. If it is still a bit sticky, just use your silicone spatula to punch it a bit. Scrape your dough out of the bowl and plop it onto the floured work surface. It will be slightly sticking to the bowl (this is normal) so I found use that silicone spatula and it will be very easy to scrape out. Only knead and turn it over a few times, it doesn't really much more kneading at this point. Add a tiny bit of flour if needed to the top to get it going. The dough should be easy to handle now (and not sticky like when you first mixed it). Form a loaf shape. Tuck in and fold the dough over the sides and flip it over, seam side down. Now grab your loaf pan and spray it well with nonstick spray, don't forget the sides. Place the dough seam side down into the greased loaf pan. Again, place a sprayed large piece of plastic wrap over the pan and secure it, but not too tight, as the dough will eventually touch the plastic.
- Set back in the oven with the light on to rise again to about 1 1/2 inches above the pan, from the center peak, anywhere from 30 minutes to an hour or so. Mine took around 45 minutes. Again, keep checking and don't forget. As soon as it is about 1 1/2 inches, remove from the oven and preheat it to 375 degrees. Peel the plastic off carefully, being gentle as to not mess with the rise.
- Bake for 25-30 minutes or until it's golden brown on top and when you thump the top it sounds hollow. Trust me, you will know if it sounds hollow. I removed mine at 28 minutes, but yours may be done at 25. Otherwise test it with an instant read thermometer and it should be between 200-210 degrees.
- Important, let the bread sit in the pan for only 10 minutes. This will settle it a bit, but the bread is still cooking and all the heat and steam will need to escape so the inside doesn't get gummy, so as soon as the 10 mins are up, carefully flip out your bread onto a cooling rack to cool for 1 1/2 hours. No choice, you must wait so the bread will finish cooking! The loaf should slide right out if you greased your pan well, but if it is a little snug, loosen the edges gently with a butter knife and flip it out.
- After it has completely cooled, use a serrated bread knife. If you try and just use a sharp smooth knife, it's not going to cut well and it will squish down your bread. Use a bread knife and cut thin sandwich slices going back and forth in a sawing motion. Eat soft as is with a sandwich, or my favorite, toast it up and have avocado toast or almond butter. So amazing toasted! As soon as it's cooled, wrap it up to prevent drying. Wrap it tightly a couple of times with saran wrap and then place it in a ziplock bag and store at room temp, not the fridge. It will be good for a few days. Keep in mind homemade bread dries out and goes stale SO much faster than commercial, because there is no dough conditioners or preservatives. Otherwise, if you want to freeze some, slice all your slices and then wrap tightly and seal and freeze. Remove and thaw or put straight into the toaster.
- See notes below.
Notes
Cook time is 25-30 minutes.
Troubleshooting: Now, if this is your first time ever making homemade bread with yeast, it may take you a couple of tries to figure out the kneading part, but I shared photos to try to help as best I could. The bread should turn out like the photos if you followed it precisely, but some variations can happen due to different environments or kneading issues. If your bread comes out perfect, great! If it is a tad on the dry side, cook it a few minutes shorter the next time or add just a tiny bit extra water when mixing the dough. If it is a tad under-cooked or gummy in the center, then increase the baking time by just a few minutes. Your bread should slice well and hold together perfectly, but if it is not, then you likely didn't need it long enough to make it elastic enough. It's important to knead it so it's smooth and appears a bit stretchy when pressing/dragging a spoon across the dough. Let me know of any questions you have!
If you make this recipe, please do not repost it in full on your site, please link to me instead giving proper credit. I work very hard to create my recipes and share them for free to be posted HERE, so please be respectful and link properly INSTEAD of just copying my recipe to your site. If you are inspired by this recipe, again, please give proper credit and do not simply post it on your site.
You got such a lovely rise on this Brandi! I can’t believe how light and airy it is. Pinning, and hopefully I’ll get around to trying it soon! Until then I’ll just look at it and drool. 😀
Thank you for posting such a descriptive recipe to follow! I haven’t baked bread in quite awhile and I want to try something new. Quick question: I usually just cover my loves with a towel while they rise. In your experience does this recipe in particular need to be sealed with the plastic wrap? I’m just wondering if the spelt flour (which I have zero experience with) tends to be affected by the potential air draft caused by a porous towel. I’m not sure I have the energy or supplies to try this twice tonight. 😉
Hi Amy! Spelt can dry out and you don’t want any air getting to it, so I would do the tight plastic wrap seal 🙂 That’s the way I always do it with this bread. Also, the dough is quite sticky, unlike regular all-purpose flour, so it would likely stick too much to the towel.
Hi Brandi, badly want to try this recipe. But, difficult to find spelt flour in Indonesia. Also it’s pricey if I could find it. Really need your advise for the substitute flour. Or if you have advise for gluten free sandwich bread recipe will be much happier. Thank you so much!
Hi Sari! I have only tested this with spelt flour so I’m afraid I can’t advise on another flour and the results. But I do have a gluten-free version coming soon, so hang tight and you can make that one instead 🙂
Thank you Brandi! I am waiting then.. 😘
A perceived recipe fail that turned into a win:
I made Brandi’s new sandwich bread recipe today and I struggled. After much conversation with her, I realized the spelt flour I used was “sprouted” spelt and it behaves quite differently from regular spelt. I’m bringing this up because if you shop at Sprouts you might be using that same spelt flour. My bread did not rise as it should have and I freaked out. I continued on and OMG it was so worth it. Even though it was shorter than regular sandwich bread, the taste and texture was better than any bread I’ve ever had .. .NO LIE..crunchy on the outside and so soft on the inside. Absolutely out of this world with all whole grain flour. None of that hard as a rock whole grain bread. Her instructions are spot on and its actually super easy. I smothered it with her rosemary white beans. I hope you guys give it a try and love it as much as we did. Do try the regular spelt for optimal results. Her instructions are so detailed you can’t go wrong.
SO happy you loved the bread so much Estee! Thank you so much for making it and as we discussed earlier, you should have higher rise results from the regular whole grain spelt flour! So happy it was such a hit! Thank you for the feedback and I loved your pics!
I tried this bread for the first time yesterday because I am trying to help my dad steer, 1. towards a vegan diet, and 2. away from mass produced, highly processed, sliced pan that we have here in Ireland! He LOVED it and I ended up making another loaf later in the day! I’ll admit, the bread was such a hit that I wanted a loaf for myself and my boyfriend, half of which is already eaten now! Thanks so much for the delicious recipe! Perfect amount of moisture and sweetness with the added special spelt taste! 10 out of 10! 🙂
Yay, I’m so happy to hear that Anna, thank you so much for the amazing feedback, so glad it was a hit with everybody!
Hi Brandi, me again, from the Rocky Mountains!
I finally had a day to sit and make bread, so right now it’s on the first rise. When I was mixing, it was pretty dry. I’m thinking if I used a water/milk combo, that might have helped. I used straight water, and probably added another 3 or so tablespoons. I’ll keep you posted on my progress. 🙂
I did find out that Great Harvest Bread Company makes their breads, with the exception of any with cheese or honey, vegan. And, honey is one of those issues 😉
Hi again Barbara! Yes, that is because you are in Denver, due to the climate being so different and drier, your batter will need more water. Here in Texas, it is so moist and hot that the readers who’ve made it in warmer climates haven’t needed extra water, but you definitely will 🙂 I have my fingers crossed that it bakes up well being in a higher altitude, like we previously discussed! Looking forward to hearing 🙂
well, it tastes really good, but it’s very heavy and almost wet inside. :-/ I bet it’ll make good toast!
Yeah, see that’s the thing with high altitude baking, it’s so unpredictable. It’s so light and fluffy each time I bake it. Maybe since your location is so different, you need to bake longer. Also, it should dry up more by the next day.
Hi Brandi, your bread looks amazing. I was wondering about apple sauce, is that just Apple cooked in a drop of water? I see it in a lot of recipes in American cooking. I live in Ireland I don’t see it used here. But I would love to try it. I have been looking for a no oil healthy bread for ages and yours looks perfect. Thank you so much for all your hard work. I tried to subscribe , but it won’t except my email address. I would love to see more of your recipes. Thanks again.
Hi Eleanor, thank you so much! It is just pureed apples into a saucey consistency, no water added. It helps to keep the bread moist. It’s kept in the dried fruit isle usually, so I would check there!
Hi, I was just wondering why you don’t recommend using sprouted spelt flour???
Hi Irene! The process of how sprouted spelt is made (pre-soaked) makes the grains more absorbent and will result in a much flatter/denser bread than standard sprout. I actually had a reader use sprouted by mistake as well and her bread was a ton shorter.
I made this recipe for the first time and it turned out great! I doubled the recipe to make two loaves I didn’t have enough maple syrup so I subbed organic sugar made in to syrup for the rest of the sweetener. I also didn’t have fresh oranges so I used orange juice concentrate and water instead. It worked really well. I live at a high altitude but the only thing I changed was that I turned the temperature down to 350 degrees and baked them for 25 minutes.
That is so wonderful to hear Cari! So very happy it worked out well, even at a higher altitude! Thank you for the feedback and so sorry I somehow missed this comment before!
Thank you for this wonderful tutorial! I’m excited to try this recipe, but have one question first–what do you spray onto the Saran Wrap before placing over the dough?
Hi Betty! I so greatly apologize for missing this comment before, so sorry! I know I’m super late, but it is just nonstick spray so that the dough doesn’t stick to the plastic wrap. I updated the notes! Hope that helps!
I’m eating a piece of this with peanut butter, maple syrup and bananas and am in heaven! I’ve never made bread before, was nervous but you walked me through it perfectly. Thanks!
Yay! I’m so very happy you made your first bread with such success Elyse! Saw your pic on IG and it was beautiful! So glad for you. Thank you very much for the feedback!! Glad the tutorial helped you so much!
i’ve made this bread recipe twice, second time being this afternoon.
however, because i did not have enough spelt flour, i sub the remaining 100g of flour with oat flour.
everything else went on smoothly and i can’t wait to try it tomorrow for breakfast!
THANK YOU FOR THIS EASY RECIPE AND YOUR INFORMATIVE POST!!
SO awesome to hear that Kylie! Thank you so much for the wonderful feedback! So glad it was a hit!
What is the reasoning behind not using sprouted spelt? Do you have any modifications so that you could use sprouted?
Hi Joelle! The process of how sprouted spelt is made (pre-soaked) makes the grains much more absorbent and will result in a much flatter/denser bread than standard sprout. I actually had a reader use sprouted by mistake as well and her bread was a ton shorter. I have only used this with regular spelt flour, so unfortunately I can only attest to making it that way.
This is our first foray into spelt bread. Although my wife, Judy, has been making wheat flour bread successfully at 7,000 feet altitude in Santa Fe, NM, we are a little tentative as are working through your wonderful directions, photos and comments.
We found this source and are now the proud owners of twelve pounds of stone ground spelt flour. https://www.amazon.com/gp/product/B004VLVM7Y/ref=oh_aui_detailpage_o00_s00?ie=UTF8&psc=1
Brandi do you have a recommendation on a scale? I’ve never owned one, and I think its time I do!
Thank you for this wonderful recipe! I can’t tolerate large amounts of wheat at the moment either but my dietitian said I can have some spelt. I added more orange juice as I can’t have apple. I love this bread toasted.
Is there any way this bread can be made yeast-free? Thanks!
Is there any way this bread can be made yeast-free, and can oat flour be mixed in too? Thank you!
Hi! No, this bread is designed to use yeast and without it, it would be much more flat and very dense. If you need a yeast-free bread, it would be better to find a recipe already written yeast-free, but I wouldn’t change this recipe as written. Homemade bread can be very finicky, so it’s best not to change it up. I can’t say how oat flour would work either since I’ve only tested it as a spelt version, but oat flour would in fact make it more dense, not light/fluffy.
Thank you for this recipe and your detailed instructions! I followed it exactly and made an excellent loaf of my very first spelt bread. In fact it was so good, I’m baking loaf #2 now. Thanks for giving me the confidence to call myself a bread baker! 😊
Oh yay, that makes me so happy to hear Lisa! Thank you so much for the lovely review!!
I did a long review a while back but wanted to come back and rate this awesome bread!! 💓
Thank you so much Estee! I really appreciate the star rating so much!
Hi! This bread looks amazing, but I was just wondering if there is something I could use instead of the cling wrap?
The main reason I want to make my own bread is to cut down on single use plastic 🙂
Hi Astrid! Hmmm, it needs to be something that can enclose the dough and not stick to it. You can try wax paper and then place a towel over the parchment paper to hold the paper down. It needs to be sealed so the dough rises properly. Hopefully this method will work as well as the plastic wrap. Let me know!